

- Add 1/8 inch bleed on all four sides so backgrounds extend past trim.
- Keep logos, QR codes, and phone numbers inside the safe zone (typically 1/8 inch inside trim).
- Build PDFs at trim size plus bleed, not at finished size with white margins.
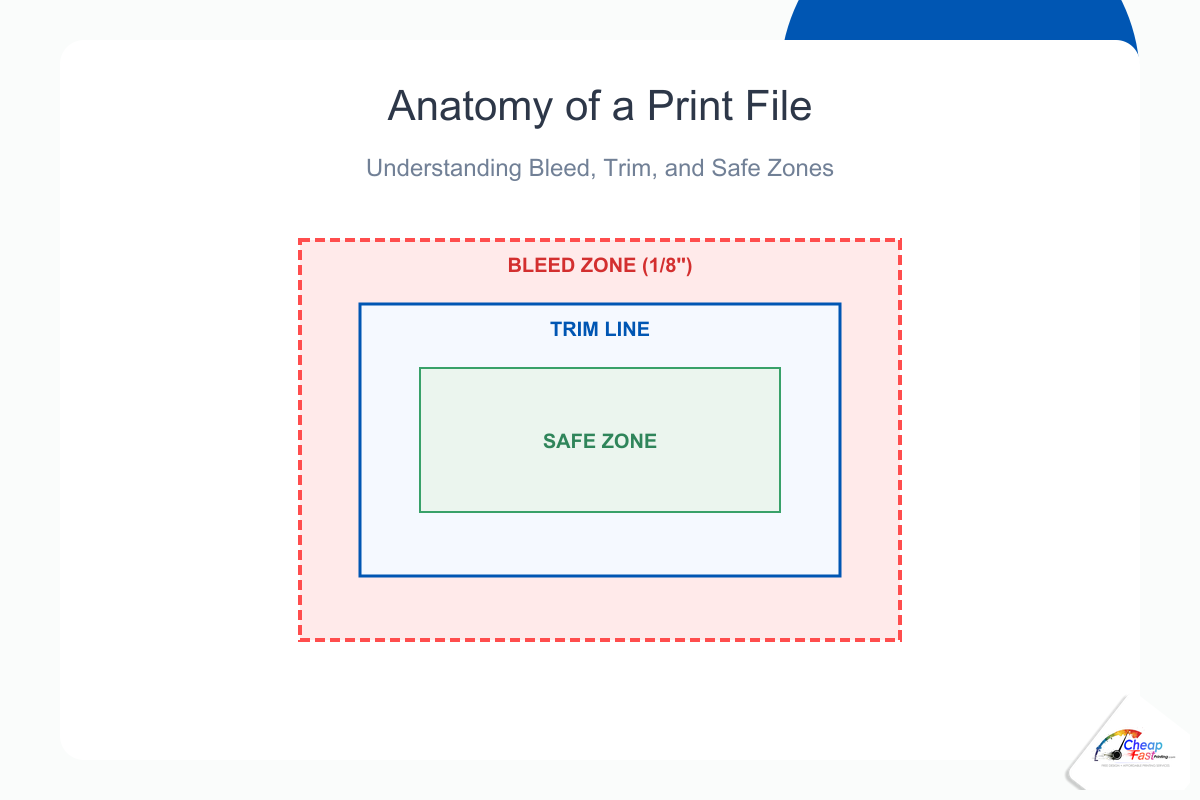
Print bleed and trim explained correctly prevents the most expensive beginner mistake in commercial printing: white slivers at the edge after a perfect-looking PDF. Bleed is extra background past the final size. Trim is the cut line. The safe zone protects type and logos from normal cutter variation. This guide covers measurements by product, tool setup, and what prepress teams flag before jobs run.
What is bleed in printing and why does it matter
What is bleed in printing? Bleed is artwork that extends beyond the final trim size so small shifts during cutting never expose the white paper edge. Commercial cutters have mechanical tolerance. Bleed buys tolerance with ink.
The white-edge problem
If your background stops exactly at the trim line, a 1/32 inch shift can reveal a white hairline. On dark designs the flaw is obvious. On busy photos it still looks unprofessional. Customers often blame “bad printing” when the file simply ended at trim with no bleed.
Standard bleed size in the U.S.
Most shops request 1/8 inch bleed (0.125 in) per side. That means your PDF is wider and taller than the finished piece. A 3.5 x 2 inch card file is often built at 3.75 x 2.25 inches including bleed. Some large-format jobs accept less, but business cards, flyers, and brochures should default to 1/8 inch unless your printer specifies otherwise.
Bleed vs margin vs slug
Beginners confuse bleed with page margins. Margins keep text away from the edge in Word processors. Bleed is for backgrounds and full-color edges only. “Slug” areas in InDesign hold notes for the printer and are trimmed away, similar to bleed in outcome but different in purpose.
Understanding the trim line
The trim line definition print teams use is the final finished size of the piece. Your PDF page includes bleed outside that line. Crop marks (if used) sit at the trim, not at the page edge.
Files must be built at trim size plus bleed. Example: a 3.5 x 2 inch business card often ships as 3.75 x 2.25 inches with bleed included.
Trim box, bleed box, and media box in PDFs
Professional PDFs can define trim and bleed boxes for automated imposition. If you export from InDesign, use the printer’s PDF preset so those boxes are correct. A PDF that looks full-bleed on screen but lacks extended pixels will still white-edge on press.
Crop marks: when they help and when they hurt
Crop marks show where to cut. Some online workflows prefer bleed-only files without marks because extra marks confuse auto-imposition. Follow your printer’s upload checklist. Never put crop marks inside the safe zone of live art.
The safe zone: protecting critical content
The artwork safe area keeps text, barcodes, and logos away from the blade path. A practical rule is 0.125 inch inside trim for cards and flyers, more for folded pieces near creases.
Why cutters drift
Guillotine stacks of hundreds of sheets compress slightly. Blade wear, humidity, and sheet curl all introduce micro-shift. Safe zones absorb that reality so your phone number is never clipped. QR codes need even more margin because a clipped quiet zone can break scanning.
Folded brochures and extra margin
Tri-folds need safe margins on panels that tuck inside, plus gutter space at folds so copy does not disappear into the crease. A rule of thumb is 0.25 inch from fold to critical text on text-heavy brochures.
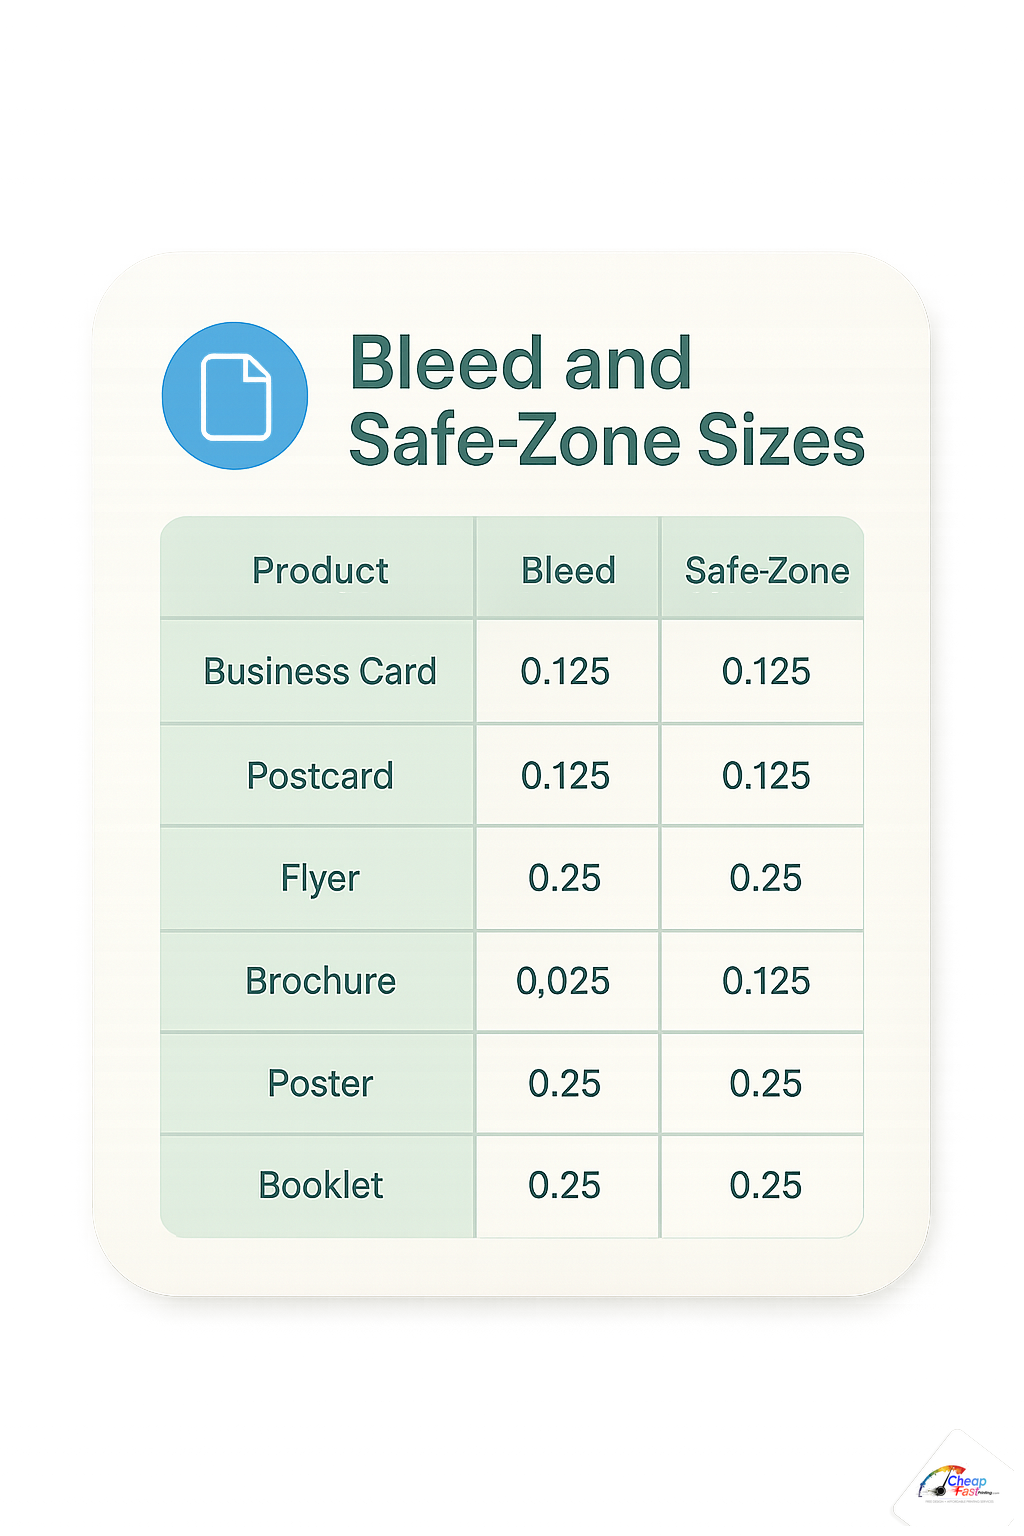
| Product | Common trim | Bleed | Safe margin (typical) |
|---|---|---|---|
| Business card | 3.5 x 2 in | 0.125 in/side | 0.125 in inside trim |
| Flyer | 8.5 x 11 in | 0.125 in/side | 0.125–0.25 in |
| Postcard | 4 x 6 in | 0.125 in/side | 0.125 in |
| Vinyl banner | Custom | Varies | 1 in+ for grommets/hems |
How to set up bleed in popular design tools
Canva
Enable bleed in download settings, extend backgrounds visually past the canvas edge, and export PDF print. Do not rely on the on-screen edge alone.
Adobe Illustrator
Set document bleed in the new file dialog. Extend background boxes to the red bleed boundary. Export PDF with crop marks only if requested.
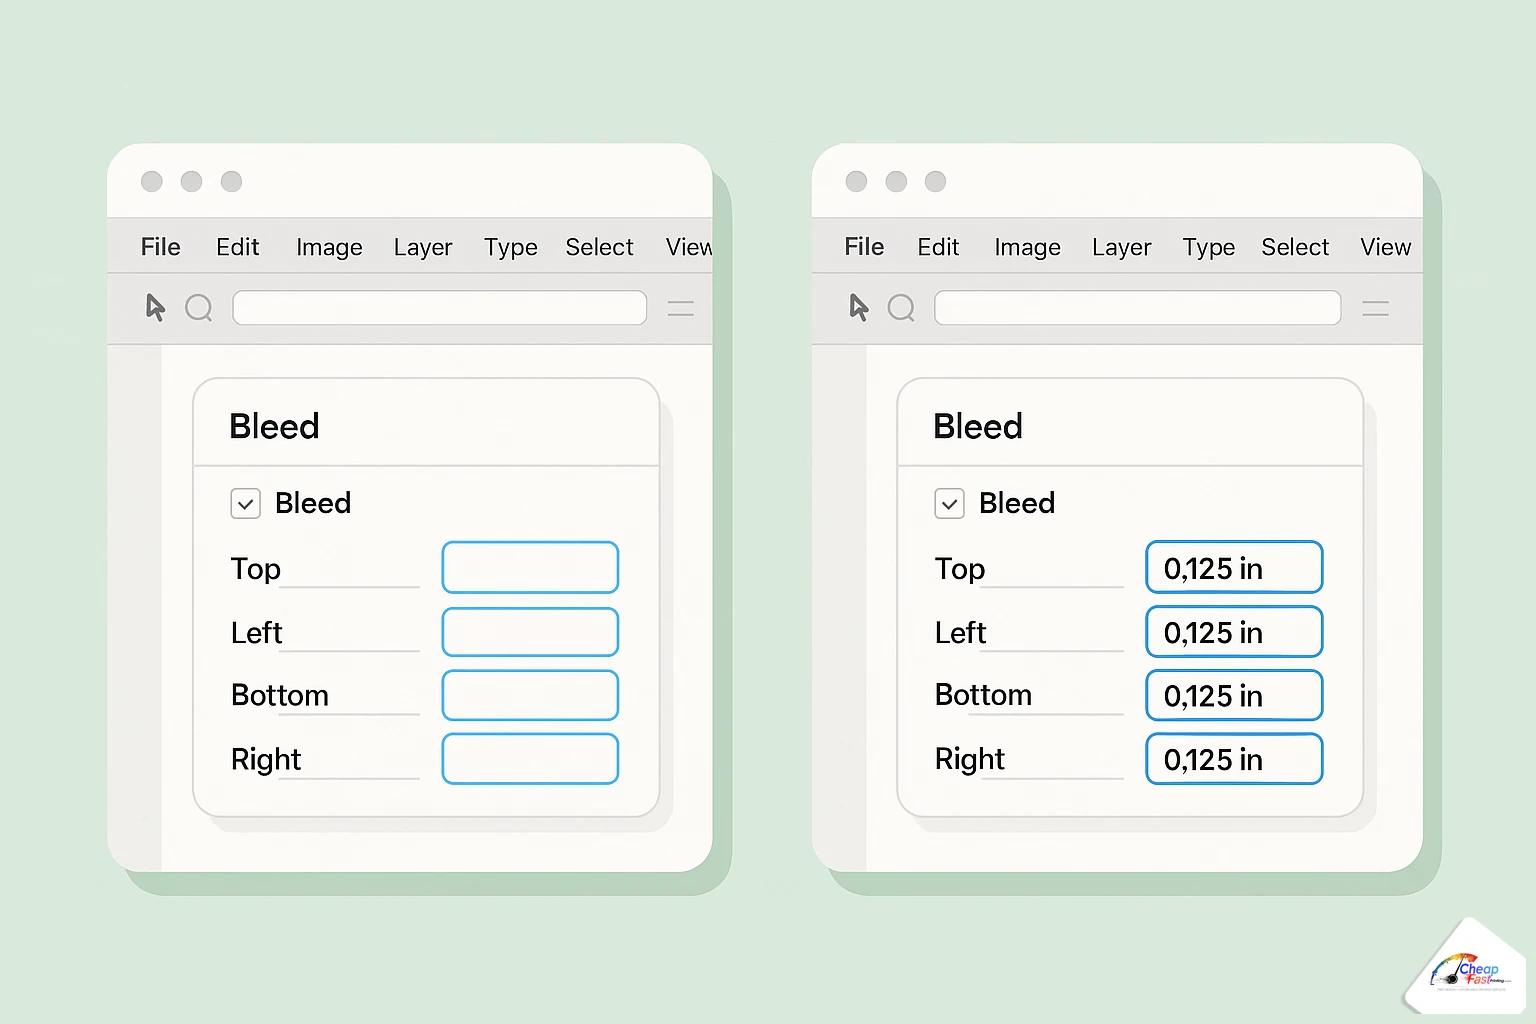
Photoshop and Word
Increase canvas size by 0.25 inch total width and height for 1/8 inch bleed per side. Keep text inside the inner safe area. Word and PowerPoint need manual margin discipline.
Export checklist before upload
- Confirm document dimensions match printer template (trim + bleed).
- Extend every full-color edge into bleed; white borders do not count as bleed.
- Move type and QR codes inward from trim.
- Embed fonts or outline type per printer guidance.
- Export PDF/X-1a or PDF print as specified.
Full bleed vs partial bleed
Full bleed printing means ink reaches all four edges after trim. That requires continuous art in the bleed zone on every side. A white border design is not full bleed even if the PDF is large; the art itself must extend.
Partial bleed might be only a top banner on an otherwise white flyer. Only sides with color to the edge need bleed extension. Mixed layouts confuse beginners who add bleed on white sides unnecessarily but forget it on photo sides.
Online templates vs custom agency files
Online printers publish free templates with pink bleed zones and green safe zones. Agencies sometimes deliver press-ready PDFs without marks. Both are valid when pixel dimensions are correct. If you receive an agency file, open it in Acrobat and verify bleed visually by zooming the edge: you should see image or color past the trim box, not empty artboard.
Double-sided bleed and front-to-back alignment
Business cards and flyers often print both sides. Each side needs independent bleed and safe zones. A perfect front bleed does not help if the back phone number sits on the trim. When designs mirror edge-to-edge art, confirm that both sides extend bleed and that registration between sides is within your printer’s tolerance. Dark front / white back layouts should check show-through so back copy stays readable.
Large-format bleed notes
Banners and signs may use hem, grommet, or pole-pocket safe zones instead of card-style 1/8 inch bleed. Art meant to wrap a pole pocket needs extra margin so faces are not sewn through. Always use the vendor’s template for specialty finishing rather than assuming card rules transfer.
Download guideline templates with bleed and safe guides pre-drawn so your team starts from a correct canvas every time.
Metric templates and U.S. bleed (mm vs inches)
International templates sometimes specify 3 mm bleed. That is close to but not identical to 0.125 inch (about 3.175 mm). When a U.S. shop asks for 1/8 inch, do not shrink a 3 mm file assuming it is the same. Follow the printer template units exactly. Mixing inch trim with metric bleed from an old European PDF is a common source of thin white lines on one side only.
What prepress checks before your job runs
Professional preflight verifies bleed extends on all sides, raster images meet resolution at final size, fonts are embedded, and CMYK is handled correctly. A missing bleed flag is a hold, not a guess, because reprints cost more than prevention.
On our floor, operators also check front-to-back alignment for double-sided cards. Bleed on side one does not fix a logo sitting in the danger zone on side two. Each face needs its own safe layout.
Cost of fixing bleed mistakes
| Stage | Typical effort | Outcome |
|---|---|---|
| Before upload | 5–15 minutes in template | Clean edges, no rerun |
| Preflight hold | Designer extends background | Delay, usually no print charge |
| After delivery | Full reprint | Highest cost and lost time |
Building bleed into your master template is the highest-return print habit for small businesses.
Cost to fix bleed problems by stage
Relative time + money index if white edges appear. Fix early on screen, not after delivery.
|
112Template with bleed
|
245Preflight hold
|
3100Full reprint
|
Reprint index set to 100. Prevention in templates is the lowest-cost path.
Common mistakes and how to avoid them
- Text on the trim: move inward to safe zone
- Background stops early: extend color into bleed
- RGB export only: see our CMYK guide
- Low-resolution logos: see our DPI guide
- Border frames hugging the edge: thin rules look uneven after trim; inset borders or use full bleed backgrounds
- Canva “crop” instead of bleed: cropping deletes pixels; bleed extends them
Scenario: dark flyer with white hairline
A gym promo with a black background stopped at trim. After 2,500 cuts, gray-white lines appeared on the right edge on roughly one in twenty pieces. Extending the black 0.125 inch into bleed fixed the next run completely.
Scenario: business card QR at the corner
A contractor placed a QR code 0.05 inch from trim. Scans failed on trimmed copies. Moving the code 0.2 inch inward restored reliability without redesigning the brand side.
Bleed requirements by industry use case
Retail and restaurants often use full-bleed food photography on flyers. Every photo edge must extend into bleed or white gaps appear on busy counters.
Real estate listing flyers mix large exterior photos with fine type. Photos bleed; agent contact blocks sit inside safe zones.
Political and nonprofit mailers face strict postal indicia zones. Bleed is for art edges; indicia and addresses have separate clear areas defined by the mail vendor.
Trade-show handouts on odd sizes still need bleed even when the piece is not mailed. Die-cut badges and custom shapes use printer templates with knock-out safe zones.
Upload your layout for a preflight review before you approve production.
Frequently asked questions
What is full bleed printing?
Full bleed means ink extends to the edge after trimming because artwork continued past the trim line on all sides.
Do I need bleed on all four sides?
Yes. Add bleed on top, bottom, left, and right. Asymmetric bleed is rare in commercial sheet-fed work.
Is 1/16 inch bleed ever enough?
Some wide-format shops accept less. For cards and flyers, assume 1/8 inch unless written specs say otherwise.
What is the safe zone on a business card?
Keep critical art and text at least 1/8 inch inside trim. More is safer for thick borders.
Do crop marks replace bleed?
No. Crop marks show trim position. You still must extend backgrounds into bleed.
Can bleed be added after design is finished?
Sometimes backgrounds can be extended in prepress, but logos near the edge may need redesign. Build bleed at the start.
Does bleed change my quoted size?
Your quoted size is usually the finished trim size. Bleed is extra area you do not see after cutting.
How does bleed work on double-sided pieces?
Each side needs its own bleed and safe setup. Show-through and front-to-back alignment are separate checks.